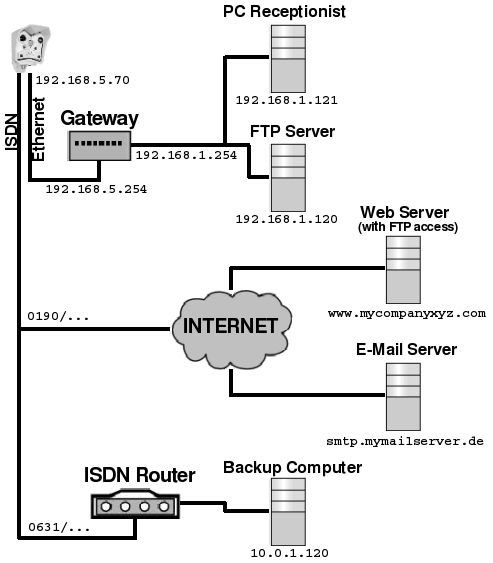
The following scenario has been designed to illustrate the configuration of network connections and their routes.
A camera is mounted at a parking area and observes the main entrance of a company building. The receptionist needs to see a Live Image of the camera. Also, during the day, the image is supposed to be presented on the company's web site which is located on an external server. During the night, the grounds are monitored. In case of an alarm, the images are not only stored on the company's network but a re sent redundantly via ISDN on a separate backup computer. In case of an alarm, an e-mail is sent as well.
The camera is integrated in the company network via Ethernet. Additionally, the camera is equipped with ISDN, so that it can connect to the Internet and dial-in to the backup computer:

Due to security reasons, the internal company network is separated from the external network connection of the camera by a gateway. The IP addresses of the two gateway interfaces are: 192.168.5.254 (external) and 192.168.1.254 (internal). The camera is assigned the (external) IP address 192.168.5.70. The receptionist's PC has the (internal) IP address 192.168.1.121 and in the case of an alarm, the camera is supposed to store images via FTP on the Intranet server 192.168.1.120.
ISDN is used for dialing-out to a provider in order to obtain an Internet connection. Thus, the camera can regularly update an image on the web server www.mycompanyxyz.com on which the company's website is hosted. On top of this, sending e-mails using freely accessible e-mail services (e.g. via the smtp.mymailserver.com server) is possible. In case of an alarm, ISDN is used also for dialing in to an ISDN router for establishing the redundant connection to the backup computer 10.0.1.120.
FTP_WEB" for updating the image on the web site. www.mycompanyxyz.com
FTP_ALARM" for storing the alarm images on the Intranet server.192.168.1.120
FTP_ALARM_2" for redundantly storing the alarm images on the backup computer.10.0.1.124
 to return to the Admin Menu.
ALARM" in the E-Mail Profiles dialog. You can use a valid DNS name for the SMTP server, e.g. smtp.mymailserver.com.
 to return to the Admin Menu.
192.168.5.70255.255.255.0 to return to the Admin Menu.
INTERNET" to the provider,Router" to the ISDN router that is connected to the backup computer.The Dial-Out Connections dialog should now contain the following entries:

 to return to the Admin Menu.
INTERNET" as the Default Route. This is the only way that the server name www.mycompanyxyz.com entered in the FTP profile "FTP_WEB" or the SMTP server name "smtp.mymailserver.com used in the "ALARM" e-mail profile can be resolved by a DNS request. No gateway is entered as this is assigned automatically.
ETHERNET" network route, you need to enter the following:
ETHERNET192.168.1.0255.255.255.0192.168.5.254Redundant" network route in order to connect to the ISDN router which has a connection to the backup computer:
Redundant10.0.0.0255.0.0.0ROUTER"The Routing dialog should now contain the following entries:

You can now check the default route in the Test Current Network Configuration dialog. If this test is successful, you can set up regular image transfers, i.e. the respective events and actions.
| de, en |